Shopping List Generator Tips
Lisa - April 3, 2024
Family Tools’ shopping list generator is one of its most innovative features and takes a lot of hassle out of preparing for a grocery trip. However, even a good tool can’t perform its best if you don’t know the tricks to using it well. With that in mind, here are some tips to getting the most out of the shopping list generator.
1. Set up your include and exclude lists
When you open the shopping list generator, you'll notice there are two extra tabs called Include List and Exclude List. The Include tab is used for items that you want on your grocery list every time you generate it, such as bread or eggs. By tailoring this to your family's needs, you can avoid forgetting things you need outside of recipes. This function is even helpful beyond food--for example, you could always include items like "Check medicine supplies" or "Paper towels."
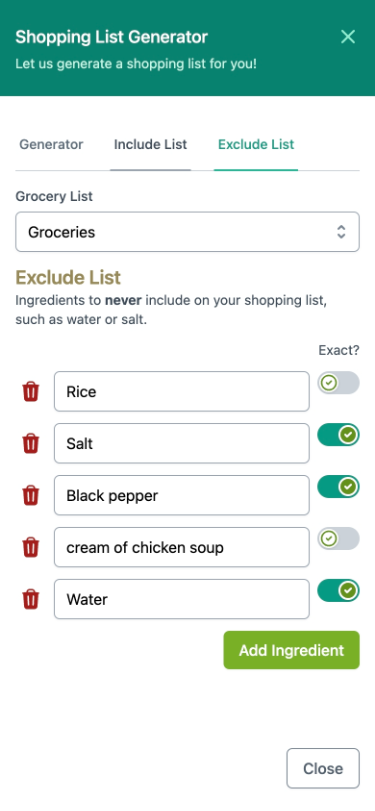
The Exclude tab is used for recipe ingredients that you usually already have, such as salt and sugar. You'll notice that each text box has a toggle switch that goes between "Exact" and "Contains." If a recipe called for garlic salt, and you had added salt to the exclude list, setting to "Exact" would keep garlic salt on the grocery list while setting it to "Contains" would leave it off.
This example illustrates that there are a few words you should be extra careful about, namely those that can be part of multiple ingredients. Pepper is a particular one to get right, since you may always have black pepper on hand, but not crushed red pepper or bell peppers. Either make sure your excluded ingredient is called "black pepper" specifically, or make sure each recipe has precise ingredient names.
2. Make sure ingredient names are consistent
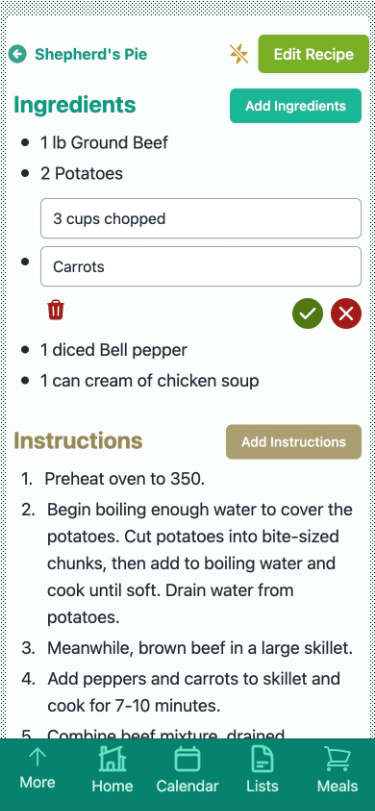
One of the generator's great attributes is its ability to combine matching ingredients from different recipes into one list item. If four different meals need milk, the app is designed to only add it to your list once. However, this only works if you've been consistent while making recipes. If one recipe asks for "milk" and another asks for "whole milk," they will be treated as different items.
Sometimes, recipes need different adjectives on the ingredients, such as "chopped carrots" versus "whole baby carrots." In cases like these, you can either put the adjective in the measurement text box or put something like "chop the carrots" into the instruction section so that the ingredients match. Alternatively, you can let the ingredients appear twice in the generator and simply uncheck one of them before adding everything to the list.
3. Use the right list
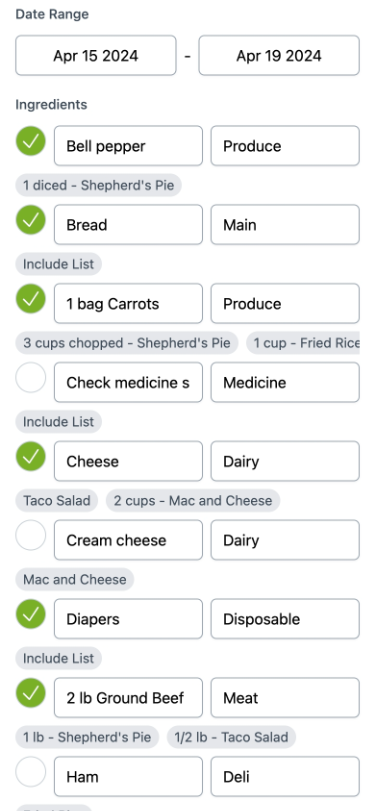
You may not have noticed, but you can actually choose which list the ingredients get added to. If you get certain foods at certain stores, then make lists for each of those stores and then only add the corresponding items to that list. Do this by selecting the store from the drop-down at the top, then unchecking any items you don't get at that store. After making one list, come back to Meals and do the same for another list. (Note that you'll have to set sections manually after changing grocery lists.)
4. Edit items for clarity
Ingredients are pulled together automatically, but you don't have to leave them as-is. If a recipe asked for russet potatoes, but you wanted to try red potatoes instead, just edit the generator item to say "red potatoes" before adding it to the list. It will leave the recipe unchanged while letting you try something new.
You can also use this feature to remember the quantity you need to buy, especially since the quantity needed for each recipe appears right below each item. For example, one recipe may need 4 oz of sour cream and another needs 8 oz, so you could make a note that you need at least 12 oz.
So, next time you make a shopping list, try using these tricks to make the generator more useful than ever. Let us help you simplify your store trip.